
Ready to become a burger master? I’m here to guide you on crafting mouthwatering homemade burgers. With my expertise and passion for cooking, I’ll share the top tools and DIY tips to elevate your burger game, making you the star of your next cookout. Let’s dive in!
Why a homemade burger is better?
A homemade burger is better than its fast-food counterpart for several reasons. Firstly, making a burger home allows you to control the ingredients, ensuring higher quality and healthier options. In addition, you can avoid processed meats high in saturated fat and sodium, as well as additives and preservatives that may negatively impact your health.
Secondly, homemade burgers cater to various dietary needs and preferences, offering the flexibility to create a meal that suits your taste and nutritional requirements. This adaptability is typically unavailable in fast-food establishments.
Thirdly, you can customize your cooking method when preparing a homemade burger, enabling you to experiment with different techniques and flavors. In contrast, fast-food joints usually rely on a single, standard procedure for all their burgers.
Additionally, homemade burgers are more cost-effective than fast-food alternatives, as purchasing fresh ingredients and preparing your patties can save money. Finally, making your burgers at home can be a rewarding experience that brings a sense of pride and accomplishment and an opportunity to bond with friends and family over a delicious, shared meal.
Top Tools for Crafting Amazing Homemade Burgers?
Having the right tools in your kitchen is crucial to elevate your homemade burger game and ensuring consistent, delicious results. Here are the must-have tools for crafting the perfect burger:
- Griddle Pan or Skillet: Lodge LDP3 Reversible Grill/Griddle, 9.5-inch x 16.75-inch
- Salt and Pepper Grinders: [Upgraded Larger Capacity] Electric Salt and Pepper Grinder Set
- Meat Grinder: LEM Products 17791 Big Bite #8
- Meat Thermometer: ThermoPro TP19H Digital Meat Thermometer
- Spatula: Silicone Spatulas, 11-inch Rubber Spatula
- Hamburger Patty Press: Cuisinart Smashed Burger Press, Cast Iron CISB-111
- Cutting Board: Large Wooden Cutting Boards for Kitchen Meal Prep & Serving
- Apron: Syntus 2 Pack Adjustable Bib Apron
- Cheese Melting Dome: Cuisinart CMD-108 Melting Dome, 9″
- Butter Wheel: Cuisinart CBW-201 Butter Wheel
One Additional Tool to make Homemade French Fries is: Sopito Professional Potato Cutter
Griddle Pan or Skillet: Cook Burgers Evenly
When cooking burgers, achieving an evenly cooked and flavorful result is vital. A griddle pan or skillet can make all the difference in the world. Here, we will discuss the benefits of using these types of cookware and present our top 3 choices to help you decide on the perfect griddle pan or skillet for your kitchen.
Using a Cast-Iron Skillet for Perfectly Seared Burgers
Among the various skillets, cast-iron skillets are considered the best option for cooking burgers. These skillets are known for their natural non-stick properties and ability to conduct heat evenly and efficiently. Preheating a cast-iron skillet ensures that your burger patties achieve that irresistibly delicious caramelized sear that makes them so mouthwatering.
Top 3 Griddle Pan or Skillet Choices for Cooking Burgers
Our Pick: Lodge LDP3 Reversible Grill/Griddle, 9.5-inch x 16.75-inch
As a cooking enthusiast, this grill/griddle stands out from its competitors due to its unparalleled heat retention and heating. In addition, its dual cooking surfaces, one smooth and the other ribbed, offer versatility for cooking various dishes.
What sets the Lodge LDP3 apart from other griddle pans is its pre-seasoning with 100% natural vegetable oil, ensuring an optimal non-stick cooking experience. I’ve used this grill/griddle on my stove, in the oven, and even over a campfire without any issues. In addition, the sturdy cast iron construction ensures durability, making it a valuable addition to any kitchen.
Compared to other griddle pans, such as the Cuisinart Double Burner Griddle or the All-Clad Hard Anodized Grill, the Lodge LDP3 offers a more affordable option without compromising quality. The main drawback is weight; this is a cast iron product.
I nominate the Lodge LDP3 Reversible Grill/Griddle as the top-ranked griddle pan or skillet due to its versatility, durability, and excellent heat retention properties. Its features make it an ideal choice for cooking burgers, pancakes, and other dishes evenly and efficiently. If you’re looking for a reliable and high-performing griddle pan or skillet, the Lodge LDP3 is an excellent investment for your kitchen.
Runner-up: 3-In-1 Pre-Seasoned Cast Iron Rectangle Pan
I recently enjoyed using the 3-In-1 Pre-Seasoned Cast Iron Rectangle Pan and would like to share my experiences. With its versatile features, excellent heat distribution, and easy-to-clean non-stick surface, I rank this pan as the second-best griddle or skillet, making it a fantastic alternative to the popular Lodge LDP3 Reversible Grill/Griddle.
What sets this pan apart from its competitors is its unique 3-in-1 design, which combines a reversible griddle grill, cast iron skillet, and dutch oven all in one product. The 6.8-quart rectangular multi-cooker roasting pan and its reversible lid allow for various cooking techniques, including frying, grilling, and baking.
One of the key benefits of the 3-In-1 Pre-Seasoned Cast Iron Rectangle Pan is its even heat distribution. Whether cooking on a stovetop or in the oven, this pan ensures that your food cooks uniformly and retains heat for consistent results. Additionally, its non-stick coating allows for easy food release and reduced oil usage, promoting healthier meals.
This cast iron pan is compatible with all heat sources, including gas, electric, induction, and campfire coals. Its extreme durability ensures it will be a staple in your kitchen for years.
However, it is heavier than other pans due to its cast iron construction, which may be an issue for some users. Furthermore, while the 3-in-1 design offers versatility, individual cookware pieces may be more specialized.
Also Good: NutriChef Cast Iron Reversible Grill Plate
It is a fantastic alternative to the Lodge LDP3 Reversible Grill/Griddle. The NutriChef Grill Plate offers excellent heat retention and even heating, ensuring perfectly cooked meals every time. Furthermore, its reversible sides, one flat and the other ridged allow for versatile cooking options.
One feature that sets the NutriChef Grill Plate apart from competitors is its size. Measuring 18 inches, it is a perfect fit for most stovetops without overlapping the middle of the stove. In addition, the cast iron construction guarantees durability, and though it is heavy at 9.75 pounds, it is a worthwhile investment for those who enjoy cooking.
Compared to the Lodge LDP3, the NutriChef Grill Plate is slightly more expensive but offers a larger cooking surface. Therefore, it is ideal for those who need to cook larger quantities or have a more prominent family. The main drawback, as mentioned earlier, is its weight, which can be an issue for some users.
I nominate the NutriChef Cast Iron Reversible Grill Plate as the third-ranked griddle pan or skillet, making it a solid alternative to the top-ranked Lodge LDP3 Reversible Grill/Griddle. The NutriChef Grill Plate offers excellent size, versatility, and heat retention properties, but it comes in at the third rank due to its slightly higher price and heavier weight.
Despite these drawbacks, the NutriChef Cast Iron Reversible Grill Plate remains a valuable option for those looking for a larger cooking surface or those who need to cook for more prominent families. As the third-best alternative to the Lodge LDP3, the NutriChef Grill Plate still provides exceptional performance and durability for those seeking a versatile griddle pan or skillet.
Salt and Pepper Grinders: Enhance Flavor
Salt and pepper grinders are essential kitchen tools that elevate the flavor of your dishes by providing freshly ground seasonings. However, with various options available, choosing the perfect grinder to suit your preferences, budget, and desired features can be challenging. To simplify the decision-making process, we’ve ranked the top 3 best salt and pepper grinders based on various factors, such as price, quality, and user reviews.
Furthermore, we understand the importance of freshly ground seasonings when preparing mouthwatering homemade burgers. Therefore, our top 3 salt and pepper grinders have been specifically chosen with burger enthusiasts in mind, ensuring that your creations are flavorful and delicious every time. So stay tuned to learn about the best grinders to elevate your homemade burger experience and impress your family and friends with restaurant-quality seasoning!
Our Pick: [Upgraded Larger Capacity] Electric Salt and Pepper Grinder Set
I’ve experimented with many salt and pepper grinders. However, I recently purchased the [Upgraded Larger Capacity] Electric Salt and Pepper Grinder Set, which has quickly become a game-changer in my kitchen. Not only does it provide exceptional performance, but it also delivers unmatched convenience and ease of use.
Its larger capacity boasting a 46g transparent container, is the first feature that sets this grinder apart from its competitors. This upgraded version offers more than double the capacity of similar products on the market, making it easier to add seasoning without constantly refilling. In addition, it can grind at least 60g of spices with full power, providing an excellent grinding experience for indoor and outdoor cooking.
Another notable feature is the Type-C fast charging capability. The TOMEEM rechargeable salt and pepper grinder set eliminates the need for batteries, and the included Type-C charger ensures a quick charging time. A fully charged stage can grind more than 60g of spices, and the charging indicator lets you know when to recharge the grinders.
The grinder set offers 6-level adjustable coarseness, allowing you to easily customize your grind from coarse to fine, catering to various culinary preferences. In addition, the high-hardness ceramic grinder ensures an even and consistent task, releasing the original aromas of the spices.
Ease of use is paramount with this electric grinder set. One-handed operation is as simple as pressing a button, and the warm yellow LED light illuminates the area, allowing you to see the freshly ground spices. This feature makes it an excellent choice for people of all ages, including children, the elderly, and those with arthritis.
In terms of design, the TOMEEM salt and pepper grinders are made of food-grade PC material and ceramic grinding core, making them a stylish and durable addition to any kitchen. In addition, the modern design and sleek black color make them an attractive gift option for various occasions, including weddings, birthdays, and holidays.
I nominate the TOMEEM Electric Salt and Pepper Grinder Set as rank 1 in the Salt and Pepper Grinders category for its larger capacity, fast charging, adjustable coarseness, ease of use, and modern design. With a 4.7-star rating from 485 reviews on Amazon and a competitive price of $49.99, it’s clear that this grinder set offers excellent value for money.
Runner-up: Premium Salt and Pepper Grinder Set of 2
It is an excellent alternative to the TOMEEM Electric Salt and Pepper Grinder. Although it ranks number 2 in the Salt and Pepper Grinder product category, it stands out with its sleek design, functionality, and durability.
What sets the Benicci Grinder Set apart from competitors is its elegant design, featuring stainless steel and thick glass construction. The easy-to-grip salt and pepper mills are visually appealing and functional, making them suitable for cozy breakfast nooks and professional kitchens.
One of the key benefits of this grinder set is the adjustable coarseness feature. With five adjustment levels, you can easily switch between coarse salt grains and fine pepper powder to suit your preferences. In addition, Benicci features non-corrosive ceramic grinders, which offer a longer lifespan than metal alternatives.
Refilling and cleaning Benicci is a breeze, thanks to the removable caps, collapsible silicone funnel, and cleaning brush. It’s important to note that the grinders are not dishwasher-safe, but the glass bottle is easy to empty and wash by hand.
While the Benicci Grinder Set is manual, as opposed to the electric TOMEEM Grinder, it still offers a user-friendly experience. The manual operation mode is easy to use and allows for greater control over the grinding process.
The only drawback to this grinder set is that it needs to be dishwasher-safe. However, with the included cleaning brush, maintaining its cleanliness is minor.
Compared to the TOMEEM Electric Grinder, the Benicci Grinder Set offers a more affordable and stylish alternative for those who prefer a manual grinder. It is number 2 in the Salt and Pepper Grinder category because it combines elegance, functionality, and durability at a competitive price.
Also Good: Gravity Electric Pepper and Salt Grinder Set
I always seek high-quality kitchen tools that make my life easier. One item that caught my attention is the Gravity Electric Pepper and Salt Grinder Set by Sweet Alice. This set offers a great alternative to the TOMEEM Electric Grinder and an exceptional grinding experience. It is an excellent addition to any kitchen.
Its automatic operation sets the Sweet Alice Gravity Electric Grinder Set apart from its competitors. Equipped with a gravity sensor switch, there is no need to press any buttons – flip the grinder, and you will have freshly ground spices. In addition, each requires 6 AAA batteries (not included) for operation, making it convenient for use anywhere.
The adjustable grinder allows you to choose the coarseness of your spices, ranging from coarse to fine. With its high-quality ceramic rotor, it ensures consistent results every time. This versatile grinder is suitable for pepper, salt, and other solid grain seasonings, making it a must-have kitchen gadget.
The unique design of the Sweet Alice Gravity Electric Grinder Set features a transparent acrylic material (BPA-FREE) at the bottom, allowing you to see the remaining spices and easily distinguish between the herbs in each grinder. In addition, the blue LED light adds a touch of elegance and provides better visibility while seasoning your dishes.
Despite its many benefits, there are a few drawbacks to consider. First, sometimes it takes effort to open the bottom of the grinder to refill the spices. Additionally, this tool makes some noise during operation but is quiet and quiet.
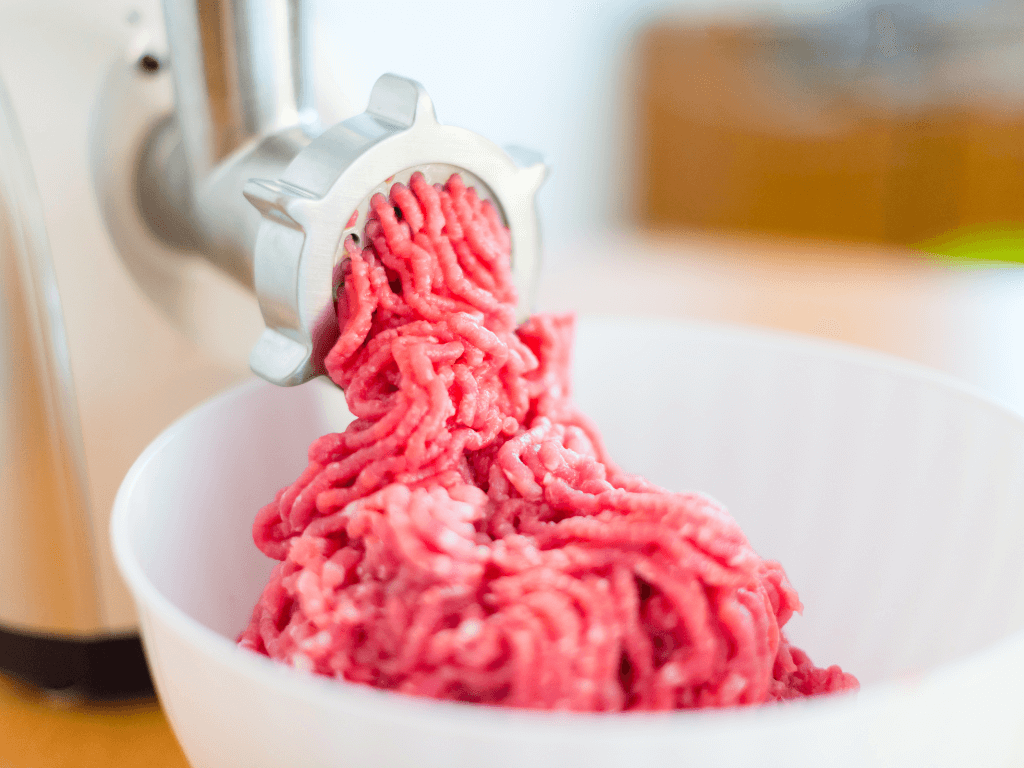
Meat Grinder: Customize Your Patty Blend
Grinding your burger meat allows you to create personalized blends and ensures that your burgers are incredibly fresh and flavorful. This process is surprisingly simple, and with the right grinder, you can become your master chef quickly.
When you grind your meat, you can choose the perfect blend of cuts, fat content, and seasoning to create mouthwatering patties. You can experiment with meat combinations like chuck roast, brisket, or a mix. Doing so lets you craft the ideal burger that suits your taste buds and caters to your culinary desires.
Moreover, freshly ground meat is safer and often healthier as it reduces the risk of contamination. You can also trim any extra fat or silver skin, ensuring your patties have the perfect texture and consistency.
To help you make an informed decision, we’ve ranked the top 3 meat grinders based on customer ratings, price, and key features:
Our Pick: LEM Products 17791 Big Bite #8
I was excited to try the LEM Products 17791 Big Bite #8 .5HP Stainless Steel Electric Meat Grinder. After using it extensively, it has exceeded my expectations and is now an indispensable tool in my kitchen.
Performance and Ease of Use
The LEM Big Bite #8 boasts a powerful .5HP motor, allowing me to grind about 7 lbs. of meat per minute or approximately 420 lbs. per hour! it is perfect for processing large quantities of meat. The grinder is also surprisingly quiet while in use, which is a bonus for those who want to maintain a peaceful atmosphere in the kitchen.
The rifled head design ensures an easier second grind and stuffing process without needing a stomper. Moreover, the machine is easy to assemble, use, and clean, making it an absolute delight.
Durability and Design
This stainless steel grinder is incredibly sturdy and built to last. The modern brushed steel finish looks great and minimizes fingerprints, maintaining a clean appearance. Furthermore, it has a storage drawer directly underneath the grinder head, perfect for storing the knife and plates.
Comparison with Competitors
What sets the LEM Big Bite #8 apart from its competitors is the combination of its powerful motor, durable construction, and thoughtful design. While other grinders are available in the market, the LEM Big Bite #8 stands out with its excellent performance, user-friendly features, and ability to quickly grind large quantities of meat.
Benefits and Drawbacks
Benefits:
- Powerful .5HP motor for efficient grinding.
- Durable stainless steel construction.
- Easy to assemble, use, and clean.
- Rifled head design for improved performance.
- Storage drawer for added convenience.
Drawbacks:
- The fine grind plate may get clogged if the meat is cold. It’s essential to ensure the meat is appropriately chilled before grinding.
Key Decision-Making Factors
- Performance: The powerful .5HP motor allows for quick and efficient grinding.
- Durability: The stainless steel construction ensures the grinder’s longevity.
- Ease of use: It is user-friendly, making it easy to assemble, use, and clean.
- Design: The rifled head design and storage drawer are convenient and improve the grinding experience.
I nominate the LEM Products 17791 Big Bite #8 .5HP Stainless Steel Electric Meat Grinder as the top choice in the meat grinder category because of its outstanding performance, durable construction, and user-friendly features. If you’re looking to invest in a high-quality meat grinder that can easily handle large quantities of meat, the LEM Big Bite #8 is undoubtedly the best choice. Its exceptional grinding capabilities, thoughtful design, and ease of use make it an invaluable addition to any home kitchen.
Runner-up: KitchenAid KSMMGA Metal Food Grinder Attachment
The KitchenAid KSMMGA Metal Food Grinder Attachment has proven to be a game-changer in my kitchen, and it’s easy to see why I rank it as number 2 in the product category. This attachment is an excellent choice if you’re looking for an alternative to the LEM Products 17791 Big Bite #8.
Its versatility and convenience set the KitchenAid KSMMGA Metal Food Grinder Attachment apart from competitors. It connects to any household KitchenAid Stand Mixer’s power hub, harnessing the motor’s power to run the grinder. As a result, it saves space on your countertop, making it a more budget-friendly option than standalone grinders.
The attachment comes with fine, medium, and coarse grinding plates and two sausage stuffer tubes, allowing you to create a wide range of dishes using fresh ingredients. In addition, the larger food tray enables you to process more in a single batch, cutting down on food prep time.
In my experience, the KitchenAid KSMMGA has been a reliable and efficient tool. I’ve used it to grind fresh meat for sausages, burgers, hard cheeses, and even fresh bread crumbs. I’ve found that pre-chilling the grinder in the refrigerator or freezer helps maintain a cold grinding temperature, resulting in a neater and cleaner grind every time.
One of the few drawbacks of the KitchenAid Metal Food Grinder Attachment is its weight of 2.5 pounds, which may be a consideration if you have limited storage space. However, the attachment is designed for easy storage and quick access, as it comes packed and organized in its storage case.
As an alternative to the LEM Products 17791 Big Bite #8, the KitchenAid Metal Food Grinder Attachment offers comparable performance at a more affordable price point and a smaller footprint.
Also Good: Cuisinart Electric Meat Grinder, Stainless Steel
Cuisinart Electric Meat Grinder has become an essential addition to my collection. With its sleek stainless steel design, powerful 300-watt motor, and an array of convenient features, this grinder quickly earned its rank as #3 in the product category, making it a fantastic second alternative to the LEM Products 17791 Big Bite #8.
With the ability to grind various types of meat, such as beef, chicken, turkey, and venison, this grinder has become my go-to tool for creating homemade sausages, burgers, and meatloaf. Its powerful motor can grind up to 3 pounds of meat per minute, ensuring professional grinding results without taking up much time.
The Cuisinart Electric Meat Grinder comes with two metal cutting plates for medium and coarse thickness, providing flexibility in the grinding process. Additionally, it includes two sausage attachments for making breakfast links and regular sausages, further expanding the variety of dishes you can create. The reverse function is a game-changer, releasing clogged foods and ensuring a smooth operation throughout the grinding process.
While using this grinder, I found it incredibly easy to assemble and use. The single on/off switch simplifies operation, and the pusher with accessory storage keeps everything organized. In addition, the grinder’s durability is impressive, with its brushed stainless steel housing providing a sturdy, long-lasting structure.
One of the few drawbacks I noticed with this grinder is its weight, at 8.5 pounds, which might concern some users when moving it around or storing it. However, this weight also contributes to the grinder’s stability during operation.
Compared to the LEM Products 17791 Big Bite #8, the Cuisinart Electric Meat Grinder offers a more compact and affordable option without sacrificing grinding efficiency. As a result, it is a fantastic choice for home cooks who want a reliable and easy-to-use meat grinder that only takes up a little space in the kitchen.
Grinding Tips
Before you start grinding, ensure your meat and grinder parts are well-chilled. It helps maintain the integrity of the meat and prevents it from becoming a sticky mess. A food processor can achieve similar results, but a dedicated meat grinder will provide better consistency and texture.
Once you’ve ground your meat, gently form the patties without overworking them, as this can lead to dense, tough burgers. When seasoning, don’t be shy – generously season the meat to ensure the flavors shine through when cooked.
Now that you have the knowledge and tools to create customized patty blends, it’s time to explore the world of homemade burgers. Experiment with different meat combinations, seasoning, and cooking techniques to craft the ultimate burger experience for yourself, your family, and your friends. Happy grilling!
Meat Thermometer: Achieve Perfect Cooking
A meat thermometer is indispensable for any home cook or professional chef, ensuring your meat burger is always perfectly cooked. In this article, we’ll discuss how to use a meat thermometer properly and provide you with our top three choices of meat thermometers, ranked to make it easy to choose the best product based on your preferences, such as budget and features.
Using a Meat Thermometer: The Key to Perfectly Cooked Dishes
To use a meat thermometer effectively, insert the end into the thickest part of the meat, avoiding any bone or fat. Then, wait about 10 seconds for a complete temperature reading. While many meat thermometers cannot get stuck in the food during cooking, some models come with a corded probe that can stay in the meat while the thermometer remains outside (see Probe Thermometers). Using a meat thermometer, you can ensure that your dishes are cooked to the minimum internal temperature for safe consumption without having to cut into the meat and risk losing its juiciness.
Top 3 Meat Thermometers: Our Recommendations
Our Pick: ThermoPro TP19H Digital Meat Thermometer
I’ve been using the ThermoPro TP19H Digital Meat Thermometer for quite some time now and can confidently say it’s a game-changer in the kitchen. Its incredible accuracy, fast response time, and user-friendly features set it apart from competitors, making it my top choice in the meat thermometer category.
Features and Performance
The ThermoPro TP19H boasts a fast reading system with a 3-4 seconds response time and an accuracy of ±0.9°F. It means you can quickly get accurate temperature readings, ensuring perfectly cooked dishes. In addition, the 2.0-inch large auto-rotating backlit display makes it easy to read the temperature in any lighting condition. Its motion-sensing sleep/wake function conserves battery life, giving you up to 3000 hours of use with the included AAA battery.
One of the things I love about this thermometer is its IP65 waterproof rating of AAA, allowing me to clean it under running water without any worries quickly. In addition, the magnetic back and hang hole make storage a breeze, ensuring the thermometer is always within reach when I need it.
Comparing to Other Products
Compared to other meat thermometers on the market, such as the Thermapen Mk4, the ThermoPro TP19H stands out due to its more affordable price point and comparable performance. While the Thermapen Mk4 may offer additional features, the TP19H provides everything a home cook or professional chef needs for precise temperature readings.
Benefits and Drawbacks
The ThermoPro TP19H offers numerous benefits, including its fast response time, accurate readings, and user-friendly design. In addition, the waterproof feature and convenient storage options make it a practical choice for any kitchen. However, one minor drawback is that its temperature reading speed may be slightly slower than some high-end models, but this difference is negligible for most users.
Key Decision-Making Factors
When choosing a meat thermometer, consider factors such as accuracy, response time, ease of use, and durability. The ThermoPro TP19H excels in all these areas, providing a reliable and convenient cooking tool.
Why It’s Ranked #1 and Why You Should Buy It
I nominate the ThermoPro TP19H as the top choice in the meat thermometer category because of its outstanding performance, user-friendly features, and affordability. Its accuracy, fast response time, and practical design make it a must-have tool for any kitchen. So if you want to elevate your cooking skills and ensure perfectly cooked dishes every time, the ThermoPro TP19H is the ultimate investment.
Runner-up: KULUNER TP-01 Waterproof Digital Instant Read Meat Thermometer
The KULUNER TP-01 Waterproof Digital Instant Read Meat Thermometer also performs well. I want to share my experiences and why I nominate it as rank 2 in the Meat Thermometer product category, just behind the ThermoPro TP19H.
One thing that sets the KULUNER TP-01 apart from competitors is its ease of use. This thermometer is incredibly user-friendly with a foldable 4.6″ food-grade stainless steel probe and auto-on/off functionality. I found it simple to store and carry; the included battery meant I could use it immediately. The thermometer is suitable for grilling, baking, deep frying, and even measuring the temperature of liquids.
I was impressed by the KULUNER TP-01’s fast response time and accuracy. It takes a temperature reading in as little as 2-3 seconds, with an accuracy of +/-1 degree over a wide range of -58℉ to 572℉. It ensures I can get an accurate temperature reading quickly without waiting for the thermometer to stabilize.
The KULUNER TP-01 is also waterproof, with an IP67 rating, making it a durable and resilient option for outdoor grilling. In addition, its ABS plastic body can withstand accidental drops and other impacts, ensuring it lasts long.
Other convenient features include switching between Celsius and Fahrenheit, a large and bright LCD with a backlight, and an easy calibration function. The thermometer also has an extra CR2032 battery and a meat temperature chart to help you cook mouthwatering meals.
Although the KULUNER TP-01 might not have some of the more advanced features of the ThermoPro TP19H, such as an auto-rotating display and motion-sensing sleep/wake functionality, it is still a great alternative. With its fast response time, waterproof design, and ease of use, the KULUNER TP-01 is perfect for an affordable and reliable meat thermometer for homemade burgers and other dishes.
The KULUNER TP-01 Waterproof Digital Instant Read Meat Thermometer is a fantastic alternative to the ThermoPro TP19H. Its ease of use, fast response time, and durability make it a reliable tool for anyone passionate about homemade burgers and other dishes. So give it a try, and you won’t be disappointed!
Also Good: Alpha Grillers Instant Read Meat Thermometer
I have extensively used the Alpha Grillers Instant Read Meat Thermometer, especially when making the perfect homemade burgers. In my experience, this thermometer has proven to be an indispensable tool for ensuring my burgers are cooked to perfection, delivering consistent and reliable results every time.
Performance and Accuracy: The Alpha Grillers Instant Read Meat Thermometer boasts a fast reading system with a 2-3 seconds response time, which is quite impressive. Its accuracy, with only a 1-degree variance for most temperatures, has ensured that my burgers are always well-cooked to the desired doneness. In addition, the wide temperature range (-58F to 572F / -50C to 300C) makes it suitable for various cooking methods, from grilling to freezing.
What sets it apart: The thermometer’s large dial with a bright blue backlight makes it easy to read the temperature, even in low-light conditions. The water-resistant IP66 rating allows for effortless cleaning under running water. The folding probe design enables compact storage and makes it convenient to reach those hard-to-measure spots.
Comparable Products: The ThermoPro TP19H Digital Meat Thermometer is a worthy competitor, offering similar features and performance. However, the Alpha Grillers thermometer has an edge in its water-resistant design and elegant foam-lined box, making it an excellent gift choice for cooking enthusiasts.
Benefits:
- Fast and accurate readings
- Easy-to-read backlit display
- Water-resistant design for easy cleaning
- Versatile temperature range
- Foldable probe for compact storage and hard-to-reach spots
Drawbacks:
- No rotating display
Ranking and Decision Factors: I nominate the Alpha Grillers Instant Read Meat Thermometer as ranked 3 in the product category, mainly due to the lack of a rotating display, which can be a minor inconvenience when trying to read temperatures from different angles. Nevertheless, it is a reliable and well-rounded thermometer that is an excellent second alternative to the ThermoPro TP19H Digital Meat Thermometer.
Spatula: Flip and Serve with Precision
A spatula is an essential tool for every kitchen, allowing you to flip, serve, and handle a variety of ingredients with precision and ease. The right spatula can transform your cooking experience, making delicate tasks like flipping beef or pancakes a breeze. We will introduce you to three of the best spatulas on the market, ranked based on their features, price, and customer reviews.
Our Pick: Silicone Spatulas, 11-inch Rubber Spatula
I recently purchased the Silicone Spatulas 11-inch Rubber Spatula set, and it has quickly become my go-to tool for cooking burgers. I appreciate having high-quality and versatile utensils. This set of four heat-resistant spatulas has exceeded my expectations regarding performance, durability, and ease of use.
One key feature that separates these spatulas is their seamless one-piece design with stainless steel inside. This construction ensures the handle remains firm and comfortable, even when flipping heavy burgers. In addition, the food-grade silicone material is safe for use with non-stick cookware and can withstand temperatures up to 500°F.
The set comes with four different spatulas in varying sizes and colors, perfect for various cooking tasks, from stirring flour for making a cake to scraping and spreading butter, cream, or salad on bread. However, I’ve found that the standard-sized spatula works exceptionally well for flipping burgers, ensuring a precise and effortless cooking experience.
Compared to other spatulas on the market, this set stands out due to its heat resistance, durability, and easy-to-clean design. The hanging loop on each spatula allows for convenient storage and quick drying. Moreover, these spatulas are dishwasher safe, making cleanup a breeze.
I nominate the Silicone Spatulas, 11-inch Rubber Spatula set as rank 1 in the Spatula product category for several reasons:
- The combination of food-grade silicone and stainless steel construction offers flexibility and sturdiness, allowing precise control when cooking burgers.
- The variety of sizes and colors included in the set ensures versatility for multiple cooking tasks.
- The easy-to-clean, dishwasher-safe design and convenient hanging loop make these spatulas a practical and efficient choice for any kitchen.
The only drawback I’ve encountered is that the spatulas may need to be more flexible for heavy-duty tasks. However, this has been fine when cooking burgers, as the flexibility allows for easy maneuvering and flipping.
Runner-up: Pack of 2 Silicone Solid Turner, Non-Stick Slotted Kitchen Spatulas
After trying various spatulas in my kitchen, I found the Pack of 2 Silicone Solid Turner a worthy alternative to the Silicone Spatulas 11-inch Rubber Spatula set. As a rank 2 product in the Spatula category, this set offers a unique combination of durability, heat resistance, and thoughtful design that sets it apart from competitors.
One of the most impressive aspects of these silicone turners is their high heat resistance. Made from food-grade silicone and BPA-free materials, they can withstand temperatures up to 446°F (230°C) without melting or deforming. It makes them ideal for cooking fish, eggs, pancakes, and more heat-intensive dishes.
These spatulas’ 18/8 stainless steel core ensures they are durable and won’t rust or break. Their anti-scald silicone handle is comfortable to hold and doesn’t conduct heat, protecting your hands from burns during cooking. The thin, flexible edge makes flipping food a breeze, while soft silicone prevents scratching on non-stick cookware.
In terms of cleaning, these spatulas are very easy to maintain. They can be wiped with hot water or placed in the dishwasher for effortless cleaning. The round hanging hole design also allows for quick drying and convenient storage.
A few drawbacks to consider about this spatula include the slightly lower sturdiness compared to the rank 1 product and a limited choice of colors. However, these factors do not affect the overall performance and quality of the Pack of 2 Silicone Solid Turner.
Also Good: KitchenAid Classic Slotted Turner, One Size, Black 2, 13.66-Inch
As a cooking enthusiast, I always seek reliable, high-quality kitchen tools. So KitchenAid’s Classic Slotted Turner, measuring 13.66 inches, caught my attention as a second alternative to the Silicone Spatulas, 11-inch Rubber Spatula. With its durable nylon construction and ergonomic design, this slotted turner has earned its rank 3 in the spatulas category.
One of the most remarkable features of this slotted turner is its large surface area, measuring 8.73 inches long by 3.38 inches wide. This ample size makes it perfect for easy food preparation and serving, whether flipping pancakes or transferring a piece of fish from the pan to your plate.
The nylon material used in the turner’s construction is heat resistant up to 450°F (232°C), making it safe for all cookware types, including non-stick. Additionally, the nylon fiberglass-reinforced head ensures the turner maintains its shape and support during use.
KitchenAid has incorporated a glossy ABS handle with a debossed logo and an ABS satin chrome-plated bolster and end cap, giving the turner an attractive and ergonomic design. It is comfortable to hold and maneuver while cooking.
As for cleaning, this slotted turner is dishwasher-safe, making the process quick and easy. However, a slight drawback is its heat resistance compared to silicone alternatives, which can withstand higher temperatures. Despite this, the KitchenAid Classic Slotted Turner’s performance remains impressive.
The KitchenAid Classic Slotted Turner, measuring 13.66 inches, is a fantastic second alternative to the Silicone Spatulas, 11-inch Rubber Spatula. With its durable construction, ergonomic design, and compatibility with all cookware types, this slotted turner makes an excellent addition to your kitchen arsenal. In addition, its easy cleaning and attractive design enhance its appeal, making it a perfect choice for those searching for a reliable and high-quality spatula.
Hamburger Patty Press: Uniform Patties Every Time
Using a Hamburger Patty Press guarantees consistent patties and saves time and effort. Say goodbye to the hassle of shaping patties by hand, which often leads to uneven sizes and cooking times. With a patty press, you can create perfectly round and uniform in seconds, ensuring they cook evenly throughout. Furthermore, it eliminates the need for seasoning and additional ingredients, allowing the natural flavors of your meat to shine through.
Based on our research and expertise, we’ve ranked the top 3 Hamburger Patty Presses available on the market:
Our Pick: Cuisinart Smashed Burger Press, Cast Iron CISB-111
As a cooking enthusiast who has tested numerous burger presses, I can confidently nominate the Cuisinart Smashed Burger Press, Cast Iron CISB-111, as the best burger press in the market. It has been a game-changer in perfectly shaped, crispy-edged, and juicy-centered burgers.
The Cuisinart Smashed Burger Press has durable cast iron that can smash burgers into perfect 6-inch flat patties that hold together during cooking. In addition, its heavy weight can press the meat evenly, ensuring the ideal patty form, resulting in a uniform thickness that cooks consistently.
What sets the Cuisinart Smashed Burger Press apart from competitors is its 1-centimeter raised edge, which helps lock in the burger’s flavorful juices while pressing. This feature contributes to the crispy edges and juicy center that burger lovers crave. In addition, I recommend using 80% ground beef with a 20% fat content to enhance the flavor further.
Compared to other burger presses like the Weston Brands and Meykers, the Cuisinart Smashed Burger Press offers an optimal balance of functionality, durability, and price. In addition, it’s easy to use and clean, making it a perfect addition to any kitchen.
One drawback I’ve experienced is that burger paper needs to be included, essential for a clean and easy transition between pressing each burger. However, burger paper can be easily purchased separately, and using it along with the Cuisinart Smashed Burger Press will significantly improve your burger-making process.
Regarding decision-making factors, the Cuisinart Smashed Burger Press excels in its heavy-duty cast iron construction, ease of use, and ability to create consistently shaped patties with crispy edges and a juicy center. Additionally, its sturdy design ensures that it will last for years, making it a worthy investment for burger enthusiasts.
Runner-up: Meykers Burger Press 100 Patty Papers Set
I’ve had my fair share of experience using burger presses. I recently tried the Meykers Burger Press 100 Patty Papers Set and found it an excellent alternative to the popular Cuisinart Smashed Burger Press, Cast Iron CISB-111. I will share my personal experiences and measurements of the product’s performance and discuss its benefits and drawbacks.
One of the key reasons I rank the Meykers Burger Press as number two in the burger press category is its ease of use and performance. The press creates perfectly round-shaped patties with professional-looking grooves. In addition, I found that the patties cooked evenly and didn’t fall apart on the grill, which can be a common issue with other burger presses.
The Meykers Burger Press is made of high-quality, food-grade aluminum and is BPA-free. The non-stick surface and 100 free parchment papers ensure that patties remain intact during removal and speed up cleanup. As a bonus, the press can be used as a roast plate and heated directly.
A unique feature of the Meykers Burger Press is its detachable solid plastic handle, which can be removed and reattached without any tools. This feature makes outdoor grilling, picnics, and camping trips convenient. Additionally, the press is dishwasher safe, making it easy to clean after use.
When comparing the Meykers Burger Press to the Cuisinart Smashed Burger Press, Cast Iron CISB-111, I found the Meykers press has several advantages. First, it comes with 100 patty papers, making separating and storing patties easier. Second, its lightweight design and detachable handle make it more portable and versatile for outdoor grilling.
However, the Meykers Burger Press also has a few drawbacks. The plastic handle may be less durable than a wooden or metal handle and may provide a different level of weight than the Cuisinart press. Therefore, it could be a disadvantage if you prefer a heavier press for creating your patties.
Based on my experience and research, the Meykers Burger Press 100 Patty Papers Set is a fantastic alternative to the Cuisinart Smashed Burger Press, Cast Iron CISB-111. Its non-stick surface, versatility, and ease of use make it an excellent choice for those who enjoy grilling burgers at home or on the go. Despite its few drawbacks, the Meykers Burger Press offers superb value for money, and I highly recommend it to anyone looking for a high-quality, easy-to-use burger press.
Also Good: FAVIA Burger Press Patty Maker with 100 Wax Papers Set
The FAVIA Burger Press Patty Maker with 100 Wax Papers Set has undoubtedly earned its spot as my third-ranked burger press product. It is an excellent second alternative to the Cuisinart Smashed Burger Press, Cast Iron CISB-111.
The FAVIA Burger Press is made from rugged anodized aluminum with a solid bakelite handle and is designed for outstanding non-stick performance, preventing rust and corrosion. As a versatile kitchen tool, it’s perfect for making ground beef patties and vegan burgers, sausage patties, and crab cakes. The mold with the handle can even double as a roast plate when baking or grilling.
One key feature that sets the FAVIA Burger Press apart from competitors is the inclusion of 100 wax papers, ensuring that your burger patties won’t stick to each other and stay intact during removal. This thoughtful addition makes for a smooth, hassle-free burger-making experience.
Using the FAVIA Burger Press is a breeze; its round-shape molds with grid patterns allow you to create professional-looking grooves and achieve the perfect burger thickness in mere seconds. In addition, the smooth surface makes cleaning easy with detergent and tap water, and the press is even dishwasher-safe for added convenience.
The FAVIA Burger Press boasts a lifetime warranty, ensuring its users a 100% satisfaction guarantee. Although it may not have the same heft as the Cuisinart Smashed Burger Press, it still provides consistent results with a lighter, easy-to-use design.
The FAVIA Burger Press Patty Maker with 100 Wax Papers Set is an excellent choice for those seeking a reliable, user-friendly burger press. Its non-stick performance, versatility, and thoughtful inclusion of wax papers make it a top contender in the burger press product category. As a second alternative to the Cuisinart Smashed Burger Press, it offers a more lightweight option without sacrificing performance, making it well worth considering for your burger-making needs.
DIY Tips for Burger Success
Crafting the perfect burger combines art and science, and with a few DIY tips, you can elevate your burger-making skills to new heights. Whether you’re a seasoned cook or a beginner in the kitchen, these tips for burger success will provide in-depth insights and inspiration to help you create a mouthwatering masterpiece that will impress family and friends. We’ll explore everything from choosing the right meat blend to perfect patty-forming techniques, cooking methods, and even the art of melting cheese. So prepare to embark on a culinary journey that transforms your burgers into delectable delights.
Choose the Right Meat Blend
Selecting the perfect meat blend is crucial in crafting a delicious burger. The right combination of lean and fatty cuts will ensure your patties are juicy, flavorful, and have a satisfying texture. So, it’s essential to understand the different cuts of beef and their characteristics, as well as the optimal lean-to-fat ratio for a delicious burger.
When choosing the right meat blend, consider the following factors:
- Lean-to-fat ratio: A standard recommendation is an 80/20 blend, which means 80% lean meat and 20% fat. This ratio provides a nice balance of flavor and juiciness without making the burger overly greasy. However, you can experiment with different proportions depending on your preference and dietary requirements.
- Beef cuts: Numerous cuts of beef can be used for burgers, each with its unique flavor and texture. Some popular options include chuck, brisket, short rib, and sirloin. Mixing different cuts can create a more complex and exciting flavor profile. For example, combining chuck, which has a beefy taste, with brisket, known for its rich fattiness, can result in a mouthwatering blend.
- Quality: When selecting meat for your burger blend, prioritize quality. Look for fresh, high-quality cuts from reputable sources, ideally from a passionate butcher who can guide the best options for your needs.
- Customization: Don’t hesitate to get creative and personalize your meat blend. You can experiment with various cuts and ratios to discover your ideal burger. Additionally, consider adding other meats, such as pork or venison, to enhance the flavor and texture of your patties.
- Seasoning: The proper seasoning can elevate the taste of your chosen meat blend. A comprehensive list of spices can help you identify which flavors work best with your selected meat, ensuring a harmonious combination that enhances the overall burger experience.
Seasoning Your Patties
The key to a mouthwatering burger is the right meat blend and the perfect seasoning. Seasoning your patties enhances flavor, making each bite more enjoyable and satisfying. To create a tasty burger experience, choosing the right combination of spices and seasonings that complement the meat blend and elevate the overall taste is essential.
When seasoning your patties, consider the following tips:
- Start with the basics: Salt and pepper are the foundation of any good burger seasoning. These basic seasonings enhance the natural flavors of the meat without overpowering them. Be sure to season both sides of your patties evenly, sprinkling salt and pepper just before cooking to retain moisture and prevent drying out.
- Experiment with spices: Various spices can add depth and complexity to your burger’s flavor. Some popular options include paprika, onion powder, and garlic powder. You can also try smoked paprika for a touch of smokiness, cayenne pepper for heat, or even brown sugar for a hint of sweetness.
- Create a seasoning blend: Mixing various spices can help you achieve a unique and personalized flavor profile for your burgers. A popular burger seasoning blend might include paprika, garlic powder, onion powder, cayenne, and black pepper. Feel free to adjust the proportions and add other spices to create your signature blend.
- Please don’t be shy with seasoning: It’s crucial to season your patties generously, as some spices and flavors may be pale during cooking. If you need help with how much seasoning to use, start with a moderate amount and adjust based on taste after cooking a test patty.
- Consider fresh herbs and other ingredients: In addition to dried spices, you can also incorporate fresh herbs, minced onion, or even grated cheese into your patties to enhance their flavor. It can add another layer of complexity and texture to your burger.
Seasoning your patties is essential in creating a delicious and flavorful burger. By starting with the basics of salt and pepper, experimenting with various spices, creating a unique seasoning blend, and incorporating fresh ingredients, you can achieve a tasty burger that caters to your taste preferences.
Perfect Patty Forming Techniques
Creating the perfect burger patty is both an art and a science. However, the proper techniques can significantly affect your burgers’ taste, texture, and appearance. These are essential techniques for forming perfect patties, ensuring your burgers are delicious and visually appealing.
- Choose the right meat blend: The ideal blend for a flavorful and juicy burger is 80% lean meat and 20% fat. This ratio ensures that your burger remains moist and tender during cooking. You can use 90% lean meat and 10% fat for a thinner option, but remember that this may result in a drier burger.
- Keep the meat cold: Chilling the ground beef before forming patties helps maintain the fat’s structure, preventing it from melting during the shaping process. It will result in a better texture and even cooking.
- Season the meat: Before forming your patties, season the ground beef with your favorite spices, such as salt, pepper, garlic powder, onion powder, or any other seasonings you prefer. Ensure even distribution of the herbs by gently mixing them into the meat without overworking it.
- Form patties gently: When shaping your patties, handle the meat gently, pressing it together just enough to form a cohesive patty without compacting it too much.
- Create uniform patties: Consistent patty size ensures even cooking. You can use a lid slightly larger than your burger bun or the top of a gallon jar to form perfectly round and even patties. Place the ground beef inside the top, press it down, and flip it onto a plate.
- Make an indentation: Burger patties puff up in the middle during cooking. To prevent this, create a shallow depression in the center of each patty using the back of a measuring spoon or your thumb. It will help the patties maintain their shape while cooking, making them even thicker.
- Chill the patties: Once ready, place them in the refrigerator for at least 30 minutes before cooking. Chilling allows the fat to firm up and helps them hold its shape during cooking.
You can create delicious, evenly cooked, visually appealing burgers every time. Remember to handle the meat gently, make uniform patties, and pay attention to the details to ensure a satisfying and enjoyable burger experience.
Cooking Methods: Grilling vs. Pan-frying
When crafting the perfect homemade burger, the choice between grilling and pan-frying can significantly impact the taste, texture, and overall experience. This guide offers an in-depth comparison of these two popular cooking methods, providing insights and inspiration to help you create the ultimate burger.
Flavor and Juiciness
Grilling and pan-frying each contribute unique flavors to homemade burgers. Grilling imparts a distinct smoky taste and charred exterior, which many people find appealing. The high grilling heat also creates a delectable crust that locks in the burger’s juices, ensuring a tender and moist interior. On the other hand, pan-frying allows the burger to cook in its fat, resulting in a rich, savory flavor and a crispy, golden-brown crust. In addition, direct contact with the hot pan helps to retain the burger’s juices, yielding a juicy, flavorful patty.
Cooking Time and Preparation
Regarding cooking time, grilling typically requires preheating for about 10 minutes to achieve the optimal temperature. Grilled burgers can cook relatively quickly once the grill is hot, often taking only a few minutes per side. Pan-frying requires less preparation time, as the stovetop heats up quickly. However, the cooking time for pan-fried burgers may be slightly longer than for grilled burgers, depending on the desired level of doneness and the thickness of the patty.
Cooking Environment and Convenience
Grilling is often associated with outdoor cooking and social gatherings, making it an enjoyable option for entertaining friends and family during the warmer months. However, grilling may not be feasible in certain living situations or during inclement weather. Pan-frying is a convenient alternative for those who do not have access to a grill or prefer to cook indoors. In addition, cooking burgers on the stovetop allows for easy temperature control and year-round burger enjoyment.
Health Considerations
Grilling is generally a healthier cooking method for homemade burgers, as the excess fat drips away from the patty during the grilling process, reducing the overall fat content. Conversely, pan-frying can result in higher fat content, as the burger cooks in its fat and any additional oil used. Therefore, grilling may be the better option for your homemade burgers if you are trying to reduce fat intake.
Grilling and pan-frying offer unique benefits and drawbacks when creating delicious homemade burgers. The best cooking method for your needs will depend on your desired flavor and texture, cooking environment, and health preferences. By understanding the differences between grilling and pan-frying, you can choose the best method for crafting your perfect homemade burger.
Mastering the Art of Melting Cheese
The perfect melt-on cheeseburger can elevate your culinary creation from good to exceptional. This guide will delve into the art of melting cheese on burgers, offering comprehensive and insightful tips to help you master this skill and create an unforgettable burger experience.
- Choosing the Right Cheese
Selecting the right cheese is crucial for achieving optimal melt and flavor. Popular choices for cheeseburgers include American, cheddar, Swiss, and Monterey Jack. American cheese is known for its superior melting qualities and creamy texture, while cheddar, Swiss, and Monterey Jack offer more robust flavors. Experiment with different cheeses to find your personal favorite.
- Preparing the Cheese
To ensure even melting, slice or grate your chosen cheese and bring it to room temperature before placing it on the burger. It allows the cheese to melt more quickly and evenly, reducing the risk of an under-melted slice or a cheese-dripping disaster.
- Timing the Melt
For the best results, add cheese to your burger during the final minutes of cooking. It allows the cheese to melt without overcooking the burger. Monitor the cheese closely, ensuring it reaches your desired melt level without becoming too gooey or losing shape.
- Using a Melting Dome or Burger Cover
A melting dome or burger cover can help achieve the perfect cheese melt on your burger. Place the dome or cover over the burger and cheese during the final stages of cooking to trap heat and steam, creating a melting environment that envelops the cheese and promotes even melting. It can be beneficial when cooking on a grill, where more than direct heat is for melting cheese.
- Butter for Added Flavor and Melt
For an extra indulgent cheeseburger, try melting a small amount of butter on the burger just before adding the cheese. The butter adds richness and enhances the flavor of the burger and the cheese, promoting even melting.
- Experimenting with Cheese Stuffed Burgers
For a twist on the traditional cheeseburger, consider creating a “Juicy Lucy” style burger by placing a slice or cube of cheese between two thin patties, sealing the edges to encase the cheese. As the burger cooks, the cheese inside melts, creating a molten cheese center that offers a delightful surprise when biting into the burger.
Building Your Ideal Burger
Creating the ultimate homemade burger is an art form that requires attention to detail, quality ingredients, and a bit of experimentation. This guide will provide tips and techniques to help you build your perfect homemade burger, ensuring a satisfying and delightful eating experience.
- Choose Quality Ingredients
Start by selecting high-quality ingredients for your burger. Freshly ground, high-grade beef chuck with an 80/20 meat-to-fat ratio is ideal for juicy, flavorful patties. Opt for fresh produce and toppings, and choose a sturdy yet soft bun that can hold up to your creation without falling apart.
- Season Your Patties
Season your burger patties to your liking, but remember that sometimes, less is more. You can create a delicious burger with salt and pepper or experiment with different herbs, spices, and seasonings to customize the flavor to your taste buds.
- Shape and Prep Your Patties
Aim for about 3/4 of an inch thick when forming your patties. Create a slight depression in the center of each patty with your finger or a spoon, preventing the meat from ballooning and ensuring even cooking. Before cooking, keep it cold (below 40 degrees) to preserve its shape and texture.
- Cook Your Patties to Perfection
Whether using a grill, stovetop, or cast-iron pan, cook your patties to your desired level of doneness, flipping only once to retain juiciness. Keep an eye on the internal temperature, aiming for 160°F (71°C) for a well-done burger or 145°F (63°C) for a medium.
- Customize Your Toppings
Experiment with different toppings to create a unique flavor profile for your homemade burger. You can add Classic toppings like lettuce, tomato, onion, and pickles with creative additions like avocado, bacon, or caramelized onions. Be bold and think outside the box!
- Choose Your Sauce
A delicious sauce can elevate your homemade burger to new heights. Whether you prefer classic ketchup, mustard, or mayonnaise or crave something more adventurous, like a special burger sauce, aioli, or barbecue sauce, the choice is yours.
- Assemble Your Burger
When assembling your burger, slather your sauce on the bottom bun. Next, place your cooked patty with its perfectly melted cheese on top. Next, layer your chosen toppings and finish with the top bun. Finally, press down gently to help the burger hold its shape.
Additional Tools to Level Up Your Burger Game
This section will explore additional tools to help you level up your homemade burger game, making the process even more enjoyable and efficient. These essential tools will allow you to create mouthwatering burgers easily and precisely, ensuring a satisfying and delightful culinary experience for you and your guests.
Cutting Board: Safe and Clean Prep Space
A quality cutting board is the foundation of a successful burger-making endeavor. Choose a sturdy, non-slip cutting board made from wood or bamboo to provide a safe and clean workspace for prepping ingredients, such as slicing tomatoes, onions, and lettuce. In addition, a well-maintained cutting board will protect your countertops and make it easier to chop and prepare toppings, ensuring a more efficient and enjoyable cooking process.
The best Cutting Board :
Large Wooden Cutting Boards for Kitchen Meal Prep & Serving
I’ve always looked for the perfect cutting board. After much research and testing, the Large Wooden Cutting Board from ROYAL CRAFT WOOD is undoubtedly the best in the market. Here’s why:
- Exceptional Material & Craftsmanship: The bamboo wood material used in this cutting board is eco-friendly, incredibly durable, and lightweight. Its thickness of 0.6 inches provides a sturdy surface for all your chopping needs without being too bulky. The two-tone design adds a touch of elegance to any kitchen, and the built-in handles allow for easy transportation.
- Knife-Friendly Surface: Unlike other cutting boards, this bamboo butcher block is gentle on your knives, helping maintain their sharpness with each use. It prolongs the lifespan of your blades and makes the cutting process more enjoyable.
- Versatility: This cutting board isn’t just for chopping; it also doubles as a charcuterie board and serving tray. Its reversible design means you can use one side for food prep and the other for presentation, making it a great addition to your kitchen arsenal.
- Deep Juice Groove: The built-in juice groove accommodates liquid runoff and keeps your countertops clean and tidy.
- Easy Maintenance: Caring for this cutting board is a breeze; simply hand wash with warm soapy water after each use and towel dry immediately. Avoid soaking to prevent warping and splitting.
- Odor-Resistant: The bamboo material is naturally odor-resistant, making it ideal for preparing various dishes without leaving any unwanted smells or flavors behind.
- Money-Back Warranty: ROYAL CRAFT WOOD offers a 1-year warranty, a money-back guarantee, and 24/7 customer support, ensuring you’re delighted with your purchase.
Comparing this cutting board to its competitors, it becomes clear why it stands out. Other cutting boards might be made from less sustainable materials or need a deeper juice groove, making this one practical. This cutting board’s versatility and elegant design also set it apart.
Apron: Protect Your Clothes
The kitchen can get messy with raw meat, sauces, and toppings. A durable, stylish apron can help protect your clothes from spills and splatters, allowing you to focus on creating your perfect homemade burger without worrying about potential stains. In addition, investing in a comfortable, easy-to-clean apron will save you time and energy in the long run and make your burger-making experience even more enjoyable. Here is the best Apron :
Syntus 2 Pack Adjustable Bib Apron Waterdrop Resistant
I’m always on the lookout for functional and stylish kitchen accessories. Recently, I came across the Syntus 2 Pack Adjustable Bib Apron Waterdrop Resistant with 2 Pockets Cooking Kitchen Aprons for Women, Men Chef in Black. It ranks number one in my list of apron product categories. I’ll share my personal experiences with this product, discuss its performance, and explain why you should choose it over other options on the market.
Material and Quality: Syntus Apron comes with high-quality polyester fiber, known for its soft touch and uniform cloth texture. It’s free from harmful chemicals, ensuring your and your family’s safety. In addition, the Apron boasts a quality of material, which is a testament to its superior construction.
Design and Fit: This Apron features a unique design with an adjustable neck strap, allowing you to achieve the most comfortable length. You can alter the long ties easily to fit most sizes, making them suitable for both men and women. In addition, its broad coverage, extending from chest to knee, provides excellent protection against kitchen grease, spills, and food stains.
Performance and Features: The Syntus Apron is machine washable and resistant to wrinkles and shrinkage. Wash it with dark-colored cloth, avoiding bleaching, dry cleaning, and tumble drying. This Apron can handle the messiest of kitchen tasks. It also has two large pockets, perfect for holding a meat thermometer, grill slips, recipe cards, and more.
Comparisons and Key Decision-Making Factors: Its blend of comfort, style, and practicality sets the Syntus Apron apart from its competitors. Its water-resistant polyester material (please note that it’s not 100% waterproof) offers ample protection. The adjustable neck strap and long ties ensure a comfortable fit for users of different sizes. Its two large pockets also make it highly functional for various tasks.
After researching and using the Syntus 2 Pack Adjustable Bib Apron, I nominate it as the number one choice in the apron product category. It’s a perfect choice for home cooks, gardeners, and professional servers, providing excellent protection and style in various settings. Whether working in the kitchen, at a backyard barbecue, or in a restaurant, the Syntus Apron will keep you neat and looking your best. So, don’t hesitate to invest in this economical and practical Apron and elevate your cooking experience with Syntus!
Cheese Melting Dome: Melt Cheese Effortlessly
Achieving that perfectly melted cheese on your burger is an art in itself. However, a cheese-melting dome made from high-quality stainless steel can help you master this skill quickly. Place the dome over your burger and cheese during the final stages of cooking to create an even, consistent melt without overcooking the patty. This essential tool will allow you to develop restaurant-quality burgers in your kitchen.
Cuisinart CMD-108 Melting Dome, 9″, Stainless steel
After trying various products, I finally found the best one: the Cuisinart CMD-108 Melting Dome, a 9-inch stainless steel dome that has earned its rank as the number one Cheese Melting Dome in my book.
The Cuisinart CMD-108 boasts a 9-inch diameter, making it ideal for covering cheese-topped burgers, vegetables, and more. The stainless steel construction ensures durability and even heat distribution, enabling cheese to melt evenly and quickly. It weighs 0.73 pounds, making it easy to handle during grilling sessions. Its dimensions (8.8 x 8.8 x 3.9 inches) suit various cooking surfaces, including skillets and grills.
One of the unique features of the Cuisinart CMD-108 Melting Dome is its ability to concentrate heat, cooking food evenly and infusing it with a delightful smoky flavor. This feature is handy when grilling vegetables, as the dome retains moisture, preventing them from drying out while achieving that sought-after char.
Compared to other cheese-melting domes, the Cuisinart CMD-108 stands out due to its high-quality stainless steel material, ease of use, and excellent value for money. In addition, customers have rated it highly for its performance, flavor enhancement, and gift ability.
Although the Cuisinart CMD-108 Melting Dome is hand wash only, its numerous benefits cover this minor drawback. I have used this dome to melt cheese on burgers, grill vegetables, and even trap the smoky flavor in various dishes. The outstanding results have made it an essential tool in my grilling arsenal.
Butter Wheel: Enhance Flavor with Ease
A butter wheel is a game-changing tool that can significantly enhance the flavor and texture of your homemade burgers. Melt butter in the wheel, and then use it to coat your buns before toasting them on the grill or stovetop. It adds a rich, buttery flavor to your buns while providing a crisp, golden-brown finish that takes your homemade burger to the next level.
Cuisinart CBW-201 Butter Wheel Stainless Steel
I can confidently say that the Cuisinart CBW-201 Butter Wheel Stainless Steel is the best butter wheel for making homemade burgers. After testing and comparing various butter wheels, I nominate the Cuisinart CBW-201 as rank 1 in the butter wheel product category, and here’s why.
The Cuisinart CBW-201 Butter Wheel stands out from its competitors due to its ease of use, durability, and efficiency. In addition, this stainless steel butter wheel is sturdy and easy to clean. It is also giftable and offers good value for money.
One of my favorite features of the Cuisinart CBW-201 Butter Wheel is its portability, making it great for cookouts and sporting events. In addition, the butter wheel heats up quickly when placed on the grill, allowing you to effortlessly butter slices of bread for sandwiches, rolls for burgers, and buns for hot dogs.
The Cuisinart CBW-201 has a removable perforated roller design, making it easy to clean and assemble. With the capacity to hold 2-3 sticks of butter, it’s an excellent choice when serving large groups. In addition, the butter wheel’s design ensures the even spreading of melted butter, providing perfectly coated buns and rolls in seconds.
After researching various butter wheels and using the Cuisinart CBW-201 Butter Wheel Stainless Steel, I found that it outperforms its competitors. In addition, it has received overwhelmingly positive reviews and ratings on Amazon, Tractor Supply, Cuisinart’s official website, Walmart, and eBay.
The Cuisinart CBW-201 Butter Wheel Stainless Steel is my top choice for buttering buns and rolls when making homemade burgers. Its durability, ease of use, and efficiency set it apart from other butter wheels on the market. In addition, it offers excellent value for money, making it an investment worth considering for anyone who loves cooking burgers and hosting gatherings.
Pair Your Burger with Delicious Sides
When creating the perfect homemade burger experience, the sides you choose to accompany your burger can make all the difference. We’ll explore three delicious and crowd-pleasing sides to elevate your burger game:
- Homemade french fries.
- A variety of salad ideas for a healthier option.
- Grilled vegetables as a flavorful alternative.
Each side complements your homemade burger, ensuring a satisfying and memorable meal for you and your loved ones.
Homemade French Fries: Sopito Professional Potato Cutter
Nothing beats the classic pairing of a juicy burger with crispy, golden homemade french fries. With the Sopito Professional Potato Cutter, you can achieve restaurant-quality fries in your kitchen. These perfectly cut fries will taste amazing and add a touch of elegance to your homemade burger meal.
Why Sopito Professional Potato Cutter?
Imagine the delight and satisfaction of creating perfectly crispy, golden homemade French fries in the comfort of your kitchen. With the Sopito Professional Potato Cutter Stainless Steel and its 1/2-inch blade, you can craft restaurant-quality fries every time. This comprehensive guide will provide insightful and inspiring information on making homemade French fries using the Sopito cutter, prioritizing your needs and ensuring a satisfying learning experience.
High-Quality, Durable Stainless Steel Blade
The Sopito Professional Potato Cutter features a high-quality stainless steel blade designed for years of use. This robust, restaurant-grade blade allows you to slice potatoes, carrots, cucumbers, eggplants, and onions with little effort, making it the ideal tool for preparing homemade French fries.
Ergonomic Handle Design for Easy Use
The extended handle of the Sopito cutter makes everything easier when making homemade fries. You can easily squeeze through potatoes with a single lever action, reducing the time and effort required to create perfectly shaped fries.
Efficient Cutting with No Quartering or Halving
The cutter’s box is 5.58″L x 3.51″W, providing ample capacity for most potatoes, sweet potatoes, and other vegetables. It means you can cut the entire potato in one go without quartering or half-cutting them, ensuring a faster and more efficient process.
Versatile and Convenient for All
The Sopito cutter cuts fries into 1/2″ pieces and is also perfect for slicing zucchini, cucumbers, and other vegetables and fruits into evenly shaped sticks. Create stunning French fries, sweet potato fries, and more with ease.
Space-Saving and Easy to Clean
Unlike bulky commercial French fry cutters, the Sopito potato cutter features a compact design, taking up minimal space in your kitchen. In addition, the stainless steel construction ensures easy cleaning with water without the worry of rust or difficult rinsing.
Choose the Sopito Professional Potato Cutter for Your Homemade French Fries
With its durable stainless steel blade, ergonomic handle, and versatile cutting options, the Sopito Professional Potato Cutter is the best tool for making homemade French fries. Its compact design and easy-to-clean features make it a must-have addition to any kitchen. Experience the joy of crafting delicious, fresh, healthy French fries for yourself, your family, and your friends with the Sopito cutter. Your air fryer, deep fryer, or oven will thank you for the perfect sidekick, and you’ll love the restaurant-quality results right at home.
Salad Ideas for a Healthier Homemade Burger Side
Finding the perfect side dish can elevate the dining experience when enjoying a homemade burger. However, choosing a healthier option, such as a salad, can add color and texture to your meal and provide essential nutrients. These are insightful and inspiring information on salad ideas to complement your homemade burger, ensuring a satisfying culinary experience for you and your loved ones.
- Simple Healthy Slaw: A classic coleslaw made with fresh cabbage, carrots, and a light dressing is a refreshing and crunchy side that complements the flavors of a homemade burger.
- Italian Chopped Salad: This salad features crisp lettuce, tomatoes, cucumbers, olives, and a tangy vinaigrette, adding a Mediterranean twist to your burger meal.
- Spicy Coleslaw: Give your slaw a kick with jalapeños or hot sauce, creating a spicy and flavorful side that pairs well with burgers.
- Mexican Style Corn Salad: Grilled corn, avocado, tomatoes, and a zesty lime dressing create a vibrant and delicious salad that pairs perfectly with a hearty homemade burger.
- Broccoli Salad: Fresh broccoli florets, dried cranberries, and sunflower seeds tossed in a light dressing create a unique and healthy salad that complements your burger’s flavors.
- Caesar Salad: A classic Caesar salad with romaine lettuce, Parmesan cheese, and creamy dressing is a delicious and satisfying side to serve alongside your homemade burger.
- BLT Salad: Combine the classic flavors of a BLT sandwich into a salad by mixing lettuce, cherry tomatoes, and crispy bacon with a light mayonnaise-based dressing.
- Quinoa Salad: Try a quinoa salad with mixed vegetables and a tangy vinaigrette for a protein-packed and nutritious side.
- Greek Cucumber Salad: This refreshing salad features crisp cucumbers, ripe tomatoes, Kalamata olives, and feta cheese, all tossed in a zesty Greek dressing.
- Corn, Tomato, and Basil Salad: Celebrate the flavors of summer with a simple salad featuring sweet corn, ripe tomatoes, and fresh basil leaves, all dressed with a light vinaigrette.
These salad ideas offer a healthier and more delicious alternative to traditional burger sides. Incorporating these options into your homemade burger meals will prioritize your and your family’s needs, creating a wholesome and satisfying dining experience.
Grilled Vegetables: A Flavorful Alternative
Grilled vegetables offer a flavorful and nutritious alternative to traditional burger sides, adding a smoky and delicious touch to your homemade burger meal. These Grilled vegetables ideas ensure a satisfying and inspiring culinary experience that prioritizes your family’s needs.
- Balsamic Vinaigrette Grilled Vegetables: Toss an assortment of vegetables, such as zucchini, bell peppers, and mushrooms, in a balsamic vinaigrette before grilling. This process imparts your vegetables a tangy and savory flavor, enhancing their natural smoky taste.
- Grilled Asparagus: Season asparagus spears with olive oil, salt, and pepper, and grill them until tender and slightly charred—this simple yet elegant side dish pairs perfectly with a juicy homemade burger.
- Grilled Corn on the Cob: Grill corn on the cob in its husk or wrapped in foil for a smoky, sweet, and tender side that complements any burger.
- Grilled Broccolini: Drizzle broccolini with olive oil, season with salt and pepper, and grill until tender and slightly charred. This vibrant and nutritious side dish adds color and flavor to your burger meal.
- Grilled Portobello Mushrooms: Marinate portobello mushroom caps in balsamic vinegar, olive oil, garlic, and herbs, then grill them. These juicy and flavorful mushrooms make a delicious and satisfying side to your homemade burger.
- Grilled Veggie Skewers: Thread vegetables, such as cherry tomatoes, bell peppers, zucchini, and red onions, onto skewers and grill until tender and slightly charred. These colorful skewers provide a fun and interactive side dish for your burger meal.
- Grilled Sweet Potatoes: Slice sweet potatoes into wedges, toss with olive oil and your favorite seasoning, and grill until tender and slightly caramelized. This sweet and smoky side dish is a tasty alternative to traditional fries.
- Grilled Eggplant: Slice eggplant into rounds, brush with olive oil and seasonings, and grill until tender and slightly charred. This hearty and flavorful side dish adds a Mediterranean flair to your homemade burger.
Incorporating grilled vegetables into your homemade burger meals will provide a healthier and more nutritious alternative to traditional sides and create a delightful and diverse dining experience for you and your loved ones. Embrace the smoky flavors of grilled vegetables and elevate your burger night to new heights.
Conclusion
Mastering homemade burgers involves utilizing top tools and following DIY tips for success. You can ensure consistently delicious results by investing in essential kitchen tools like a griddle pan, meat grinder, and patty press. Additionally, adapting your burger recipes and cooking methods to suit personal preferences will impress friends and family with your culinary skills. With these tools and techniques, you can elevate your homemade burger game and become a true master.